
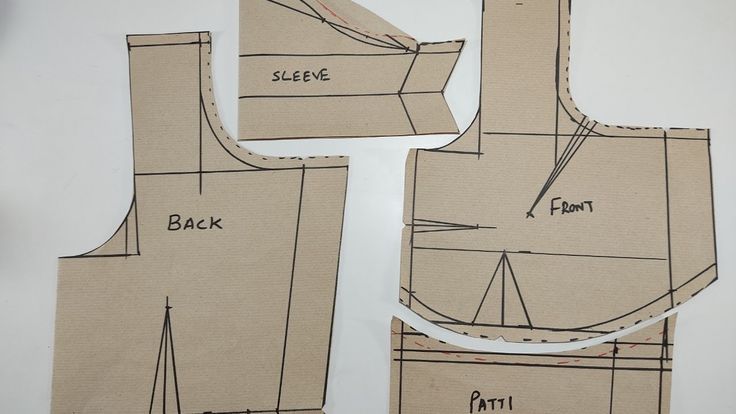
How to Take Measurements for Blouse Cutting
A perfectly stitched blouse enhances the beauty of any saree or lehenga. But for a flawless fit, taking accurate measurements is key. Whether getting a blouse stitched by a tailor or ordering online, knowing how to take blouse measurements properly saves time and ensures comfort; in this blog, we’ll guide you step-by-step on taking measurements for blouse like a pro.
Why Accurate Blouse Measurement Is Important
A well-fitted blouse:
- Enhances your body shape
- Offers better comfort
- Complements sarees, lehengas, and skirts beautifully
- Prevents wardrobe malfunctions during functions or parties
Things You Need Before Taking Measurements
- A soft measuring tape
- A fitted, non-padded blouse (for accurate results)
- Mirror (to check angles)
- Pen and paper or phone to note the sizes
- A friend (optional) to help with back measurements
Blouse Measurement Points (Front and Back)
Let’s now go through each measurement in detail:
1. Bust Size
- Measure around the fullest part of your bust.
- Keep the tape straight and snug, not too tight.
- Stand straight and breathe normally.
- Tip: Don’t wear a padded bra while taking this measurement.
2. Underbust
- Measure around the ribcage, just below the bust.
- This helps in defining the blouse’s grip and shape.
3. Waist
- Measure the narrowest part of your waist (usually above the navel).
- Useful for longer blouse styles or waist-length designs.
4. Shoulder Width
- Measure from one shoulder tip to the other (backside) in a straight line.
- This is important for sleeve and neckline fitting.
5. Blouse Length
- Measure from the shoulder point to your desired blouse end (usually the waist or above the navel).
- Consider high-waist saree or lehenga styles if choosing crop blouse styles.
6. Armhole / Arm Round
- Wrap the tape around your shoulder joint or armpit (like a half-circle) to get a comfortable armhole size.
- Important for ease of movement.
7. Sleeve Length
- Decide how long you want your sleeve: cap sleeve, elbow, 3/4th, or full sleeve.
- Measure from the shoulder tip to the desired length.
- Optional: For puff sleeves, add 1-2 inches extra.
8. Sleeve Round / Bicep
- Measure around the fullest part of your upper arm.
- Note the sleeve opening round for tighter or designer sleeves (near the elbow or wrist).
9. Neck Depth – Front & Back
- Measure from the shoulder down to how deep you want your neckline.
- You can note both front and back neck depth separately for better styling.
10. Apex Point / Bust Point
- Measure the distance between both bust points (nipple to nipple).
- It is important for dart placement in fitted blouses.
11. Shoulder to Apex
- Measure from shoulder to bust point (used for shaping princess-cut or padded blouses).
12. Back Width
- Measure across your upper back, just below the shoulder blades.
- This helps in avoiding tightness in the back panel.
13. Blouse Opening Side
- Note whether you want the blouse opening at the front, back, or side (left or right).
- Some designs require specific placements.
Blouse Measurement Tips
- Always stand straight and relaxed while measuring.
- Take help for tricky areas like the back or armhole.
- Re-check all measurements for accuracy.
- Add half an inch extra for stitching ease unless you want a tight fit.
- Mention if padding, lining, or hooks are needed.
Final Thoughts
Taking correct blouse measurements is essential for a flattering, custom-fit blouse. Whether for a traditional silk saree or a trendy lehenga, a perfectly stitched blouse boosts your confidence and completes the ethnic look. With this detailed blouse measurement guide, you can confidently provide measurements to any tailor or online boutique.
FAQs
Q1. What is the Most Important Measurement for a Blouse?
Ans: The bust and under bust measurements are the most crucial as they determine the blouse’s fit and comfort. Accurate shoulder and blouse length are also important for overall shape.
Q2. How Much Seam Allowance Should I Add to My Blouse Measurements?
Ans: It’s recommended to add 0.5 to 1 inch of seam allowance for each measurement to allow easy movement and tailoring adjustments.
Q3. Should I Take Blouse Measurements over Clothes?
Ans: No. Always take measurements over a well-fitted, non-padded innerwear or blouse for the most accurate results.
Q4. How Do I Measure for a Padded Blouse?
Ans: For padded blouses, take your bust measurement with a non-padded bra, and inform the tailor that you want padding added. They will adjust accordingly.
Q5. What if My Left and Right Shoulder Measurements are Different?
Ans: It’s common to have minor differences. Measure both shoulders and inform your tailor. They can balance it during stitching for proper fitting.
Q6. Can I use an old Blouse for Taking Measurements?
Ans: Yes, if it fits perfectly. Measure directly from that blouse or use it as a reference when explaining your requirements to the tailor.
Q7. How do I Choose the Right Blouse Length?
Ans: Blouse length depends on personal style and the type of saree or lehenga. For traditional looks, opt for waist-length. For modern styles, crop-length or below-bust lengths are trendy.
Q8. What’s the Standard front and back Neck Depth?
Ans: For a regular blouse, front neck depth is 6–7 inches and back neck depth is 8–10 inches. You can customize this based on your comfort and design preference.
Q9. Do Blouse Measurements Change with Padded vs non-padded Blouses?
Ans: Yes, slightly. Padded blouses may require slightly less bust measurement. Always inform your tailor if you want padding included.
Q10. Should I Give Exact or Loose Measurements for a Blouse?
Ans: Always give exact body measurements. The tailor will add ease allowance while stitching for comfort.
